


A risk matrix helps construction and capital project managers identify and prioritize risks before they cause delays or budget issues. It organizes risks by likelihood and impact, making it easier to focus on critical threats.
This guide explains what a risk matrix is, why it matters, and how to use it effectively to simplify risk management.
What is a Risk Matrix in Construction Projects?
A risk matrix in construction project is a chart that helps identify and assess risks. It shows how likely a risk is to happen and how serious its impact could be. By using this tool, project managers can rank risks from low to high and decide which ones need urgent action. This makes it easier to manage safety, costs, and project timelines.
The risk matrix excels in qualitative risk management, where decisions are based on expert judgment rather than numerical data. Its intuitive, color-coded system—green for low risks, yellow for moderate, and red for high risks—enables teams to easily visualize and monitor potential issues, ensuring nothing falls through the cracks.


Why Use a Project Risk Matrix?
A project risk matrix helps teams identify and manage risks before they cause delays, budget overruns, or safety issues. It provides a clear, structured way to assess risks and prioritize mitigation efforts. Here’s why using a risk matrix is essential in project management:
- Early Risk Detection: Identifies potential threats before they escalate, reducing project disruptions.
- Improved Decision-Making: Helps prioritize risks, ensuring resources are allocated where they matter most.
- Clear Risk Communication: Provides a visual representation that makes risk levels easy to understand for all stakeholders.
- Better Project Planning: Supports proactive risk management, keeping projects on schedule and within budget.
- Enhanced Safety Measures: Highlights hazards early, helping teams implement preventive measures and comply with safety regulations.
For example, in a commercial building project, project managers often face supply chain delays for critical materials like steel and concrete. A risk matrix helps identify this early, allowing managers to secure alternative suppliers or adjust procurement schedules. This prevents costly construction slowdowns and keeps the project on track.
Components of a Construction Risk Matrix Table
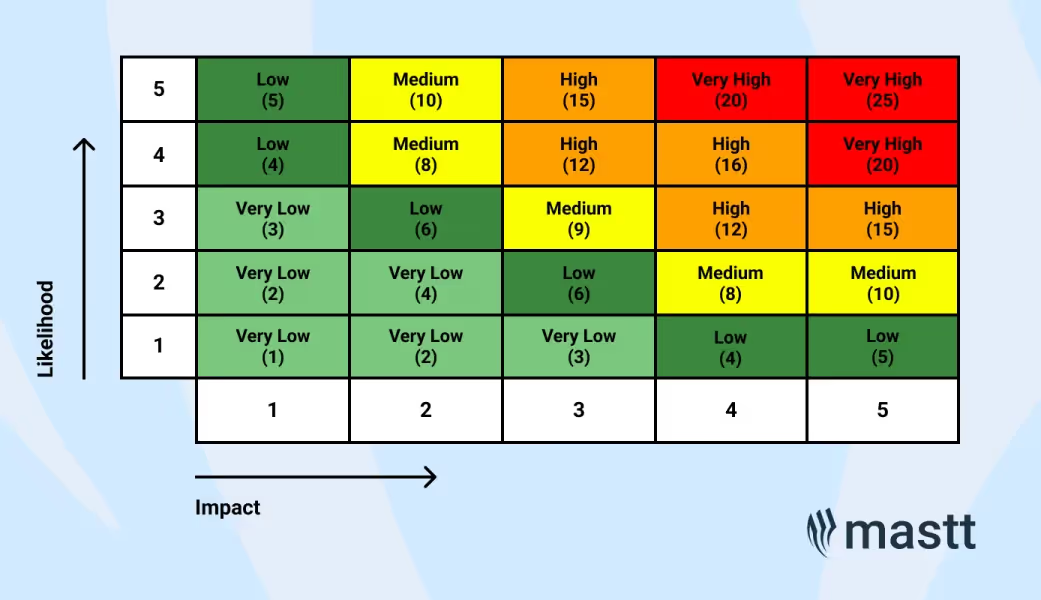
A risk matrix table includes a grid structure, likelihood, impact, risk score, and risk rating. The grid maps likelihood on the x-axis and impact on the y-axis. Likelihood measures how often a risk may occur, while impact assesses its severity. The risk score multiplies these values to rank risks, and the risk rating categorizes them by severity using a color-coded system.
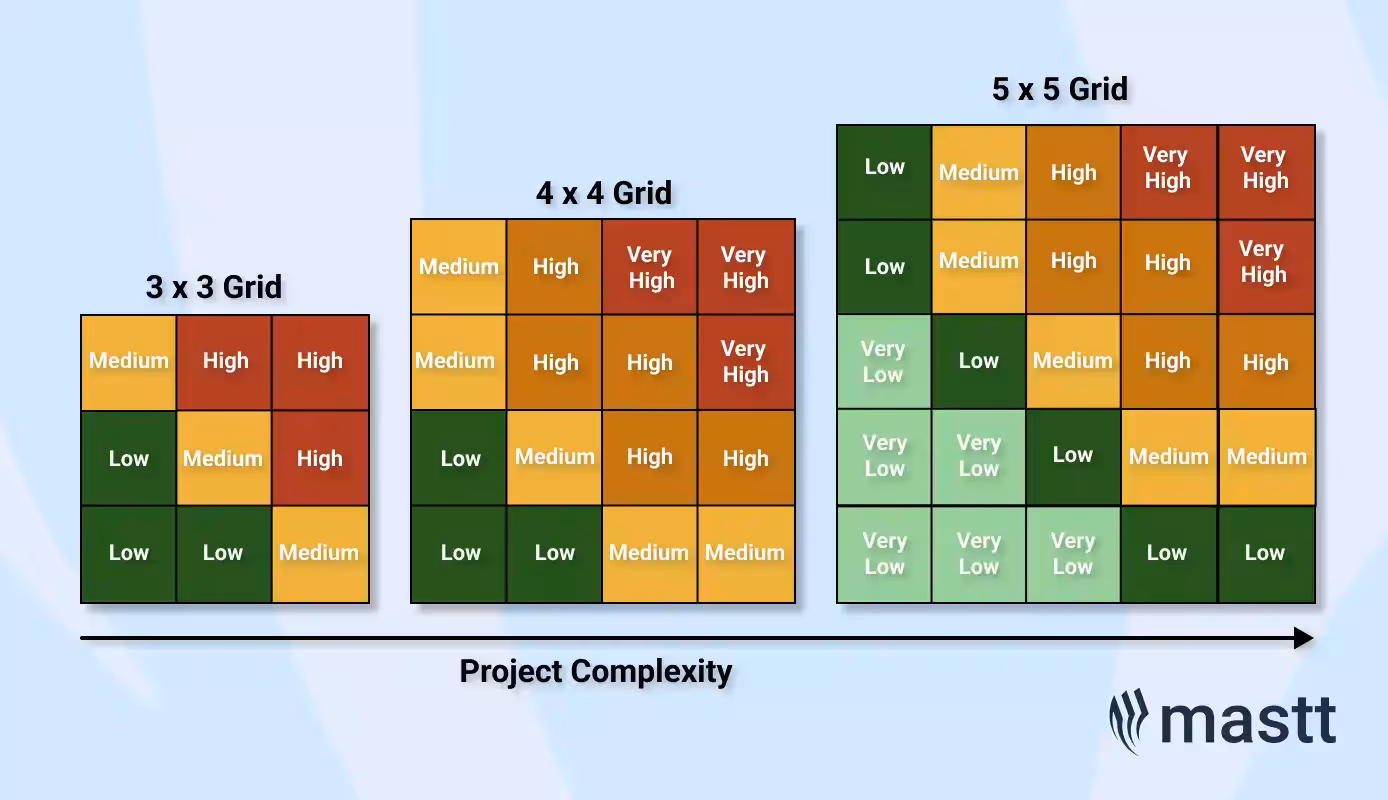
1. Grid Structure
The grid structure forms the foundation of the risk matrix design, whereby typically the x-axis represents the likelihood of the risk occurring, and the y-axis represents the potential impact of that risk. The matrix dimensions can vary based on factors such as project complexity and the chosen risk management framework, ranging from 3x3, 4x4, 5x5, or even custom configurations tailored to specific project needs.
2. Likelihood
Likelihood refers to the chance of a risk event happening. The table below provides an overview of the different likelihood levels, including their definitions and associated probabilities.
3. Impact
Impact evaluates the potential severity of consequences if a risk occurs. Below are common impact descriptors, along with their definitions and examples frequently encountered.
4. Risk Score
A risk score quantifies the significance of a risk by multiplying likelihood and impact values. For example, if a risk is “Likely” (4) and has a “Major” impact (4), the risk score is 16.
This score helps quantify the overall risk level, making it easier to rank and prioritize risks. The higher the risk score, the more attention and resources should be allocated to managing that risk.
5. Risk Rating
The risk rating categorizes risks into various levels of severity, such as very low, low, medium, high, and very high. The risk rating simplifies decision-making by clearly showing which risks require immediate action and which can be monitored over time.
This rating is often represented through a color-coded system as outlined within the risk rating matrix below.
How to Use a Risk Matrix Chart
Using a project risk matrix chart is all about simplifying the risk management process to help you make better decisions for your project.
Once you've got your project risk matrix set up, here's how you can use it effectively:
- Download and Customize Matrix Template: Start by downloading a risk matrix template that fits your project needs. Customize the template by adjusting the layout, adding your company’s branding, and modifying any fields to align with the specific requirements and complexity of your project.
- Identify Your Project Risks: List all potential risks that could impact your project. Be thorough and consider risks across all aspects—financial, operational, technical, and external factors such as regulatory changes or supply chain disruptions. Clearly define each risk to ensure a comprehensive understanding.
- Assess the Likelihood and Impact: For each identified risk, assess both the likelihood of it occurring and its potential impact on the project. Use scales, such as from 1 (rare) to 5 (almost certain) for likelihood, and from 1 (insignificant) to 5 (catastrophic) for impact. This step helps quantify the risk and prepares it for visual representation.
- Plot Risks on the Matrix: Using the likelihood and impact scores, plot each risk on the risk matrix table. Place them within the appropriate cells where the x-axis represents likelihood and the y-axis represents impact. This visual representation helps highlight which risks need the most attention.
- Prioritize Your Risks: Once all risks are plotted, prioritize them based on their position in the matrix. Risks that fall in the high likelihood, high impact areas (top-right) should be addressed first, as they pose the greatest threat. Lower likelihood, lower impact risks can be monitored with less urgency.
- Decide on Mitigation or Response Plans: For the highest-priority risks, develop strategies to mitigate or respond to them. This could include actions to reduce the likelihood of the risk or minimize its impact. Make sure to assign responsibility to specific team members for managing and executing these strategies.
- Monitor and Update: Construction risk management is an ongoing process. Regularly review the matrix to monitor changes in risk levels and update the likelihood and impact as needed. New risks may also arise during the project, which should be added to the matrix and assessed accordingly.
- Keep Records: Ensure that the risk matrix is well-documented and kept up to date as part of the project’s official records. This documentation will be valuable for compliance audits, future reference, or post-project analysis, ensuring that lessons learned are captured for future projects.
Looking for more? Discover all the essential steps for building an effective risk matrix within our blog - How to Create a Risk Assessment Matrix.


What do you do with Risk Matrix Results?
Once you’ve developed your risk assessment matrix and identified the key risks, the next step is to determine how to manage and mitigate these risks effectively. The risk matrix results should guide your decision-making process in several ways:
- Prioritize Risk Mitigation Efforts: Focus your resources on the highest-risk items, those that fall into the high likelihood and high impact categories. These risks require immediate attention and proactive measures to prevent them from derailing your project.
- Develop Contingency Plans: For risks identified as high but unavoidable, develop contingency plans. These plans should outline the steps to take if the risk materializes, minimizing its impact on the project.
- Allocate Resources: Based on the risk matrix, allocate resources—such as time, budget, and personnel—to manage the most critical risks. Ensure that your team is prepared to address these risks as they arise.
- Monitor and Review: Continuously monitor the identified risks and their management strategies. Regularly review and update the risk analysis matrix as the project progresses, ensuring that new risks are captured and managed effectively.
- Communicate with Stakeholders: Keep all relevant stakeholders informed about the risks and your plans for mitigating them. Clear communication ensures that everyone is on the same page and that there are no surprises if a risk event occurs.

Risk Matrix Example
To illustrate this process, consider a construction project where several potential risks have been identified.
Here’s how a 5x5 risk matrix can be utilized to systematically assess and prioritize these risks:
- Risk 1: Delayed Material Delivery
- Likelihood: High (5) – This event is expected to occur in most circumstances (>95%).
- Impact: Moderate (3) – Significant delays, causing disruptions in timelines (15-30% increase in time experienced).
- Risk Score: Mutliplying these scores (5 x 3), gives a risk score of 15.
- Reviewing this against the risk matrix, rates the risk as “High”, meaning that the tolerance level is unacceptable without treatment. Exposure to this level of risk may only continue with a clear treatment plan to reduce the level of risk.
- Risk 2: Extreme Safety Incident on Site
- Likelihood: Unlikely (2) – The event is not expected to occur (>5% to 29%).
- Impact: Catastrophic (5) – Widespread fatalities or injuries, resulting in total safety system failure and demanding national or industry-level intervention.
- Risk Score: Multiplying these scores (2 x 5), gives a risk score of 10.
- Reviewing this against the risk matrix, rates the risk as “Medium”, meaning that the tolerance level is acceptable with ongoing review. Exposure to this level of risk may only continue with a clear treatment plan which is reviewed regularly.
- Risk 3: Equipment Malfunction
- Likelihood: Possible (3) – The event will probably occur in some limited circumstances (>30% to 69%).
- Impact: Insignificant (1) – Minor delays, causing minimal impact on timelines (<5% increase in time experienced).
- Risk Score: Multiplying these scores (1 x 3), gives a risk score of 3.
- Reviewing this against the risk matrix, rates the risk as “Very Low”, meaning that the tolerance level is acceptable with periodic review. Exposure to this level of risk is acceptable without additional risk treatments.
By using the matrix, you can see right away that while the delayed material delivery and extreme safety incident on site are important, with the equipment malfunction being less severe.
This approach enables the team to prioritize critical risks proactively, without attention and resources being drawn elsewhere.
Conclusion
Managing risks in construction projects can be challenging, but a risk matrix makes it easier. By identifying, assessing, and prioritizing risks, you can stay ahead and keep your project on track.
For more tips and tools, check out our additional resources on the Mastt website, where you’ll find insightful blogs on project reporting and risk management tools.
.avif)
Written by
Jamie Cerexhe
Jamie Cerexhe is the Chief Technology Officer at Mastt and has a wealth of experience in software development and project management. As a dedicated problem-solver, Jamie has been pivotal in delivering innovative solutions that meet business needs and enhance user experiences. His goal is to continue leveraging technology to drive progress and create value. Outside of work, Jamie enjoys exploring new tools and trends in the tech world, always staying ahead of the curve.


Contributions by

5x5 Risk Matrix Template
Free 5x5 Risk Matrix Template! Evaluate and prioritize risks based on their likelihood of occurrence and potential impact on the project.

Walk Into Every Meeting With Confidence, Clarity, and Control
No one wants to look unprepared, blindsided, or uncertain in front of stakeholders — but that’s exactly what happens without Mastt.
Start for FreeTrusted by the bold, the brave, and the brilliant across governments, Fortune 500s, and the world’s best in delivering the future

.avif)


